 Good evening and welcome to our June blog hop! We are so glad you are here! Did you get a chance to see Frances Wagner’s post yet? If not make sure you hop all the way through and see it. She always does something fantastic!
Since Stampin’ Up! has SO many fantastic stamp sets, punches and more that feature bugs from cute little ladybugs to elegant dragonflies and more! So, this month’s theme is Cute as a Bug! Our projects could be ANYTHING as long as there was something buggy/buggish about it!
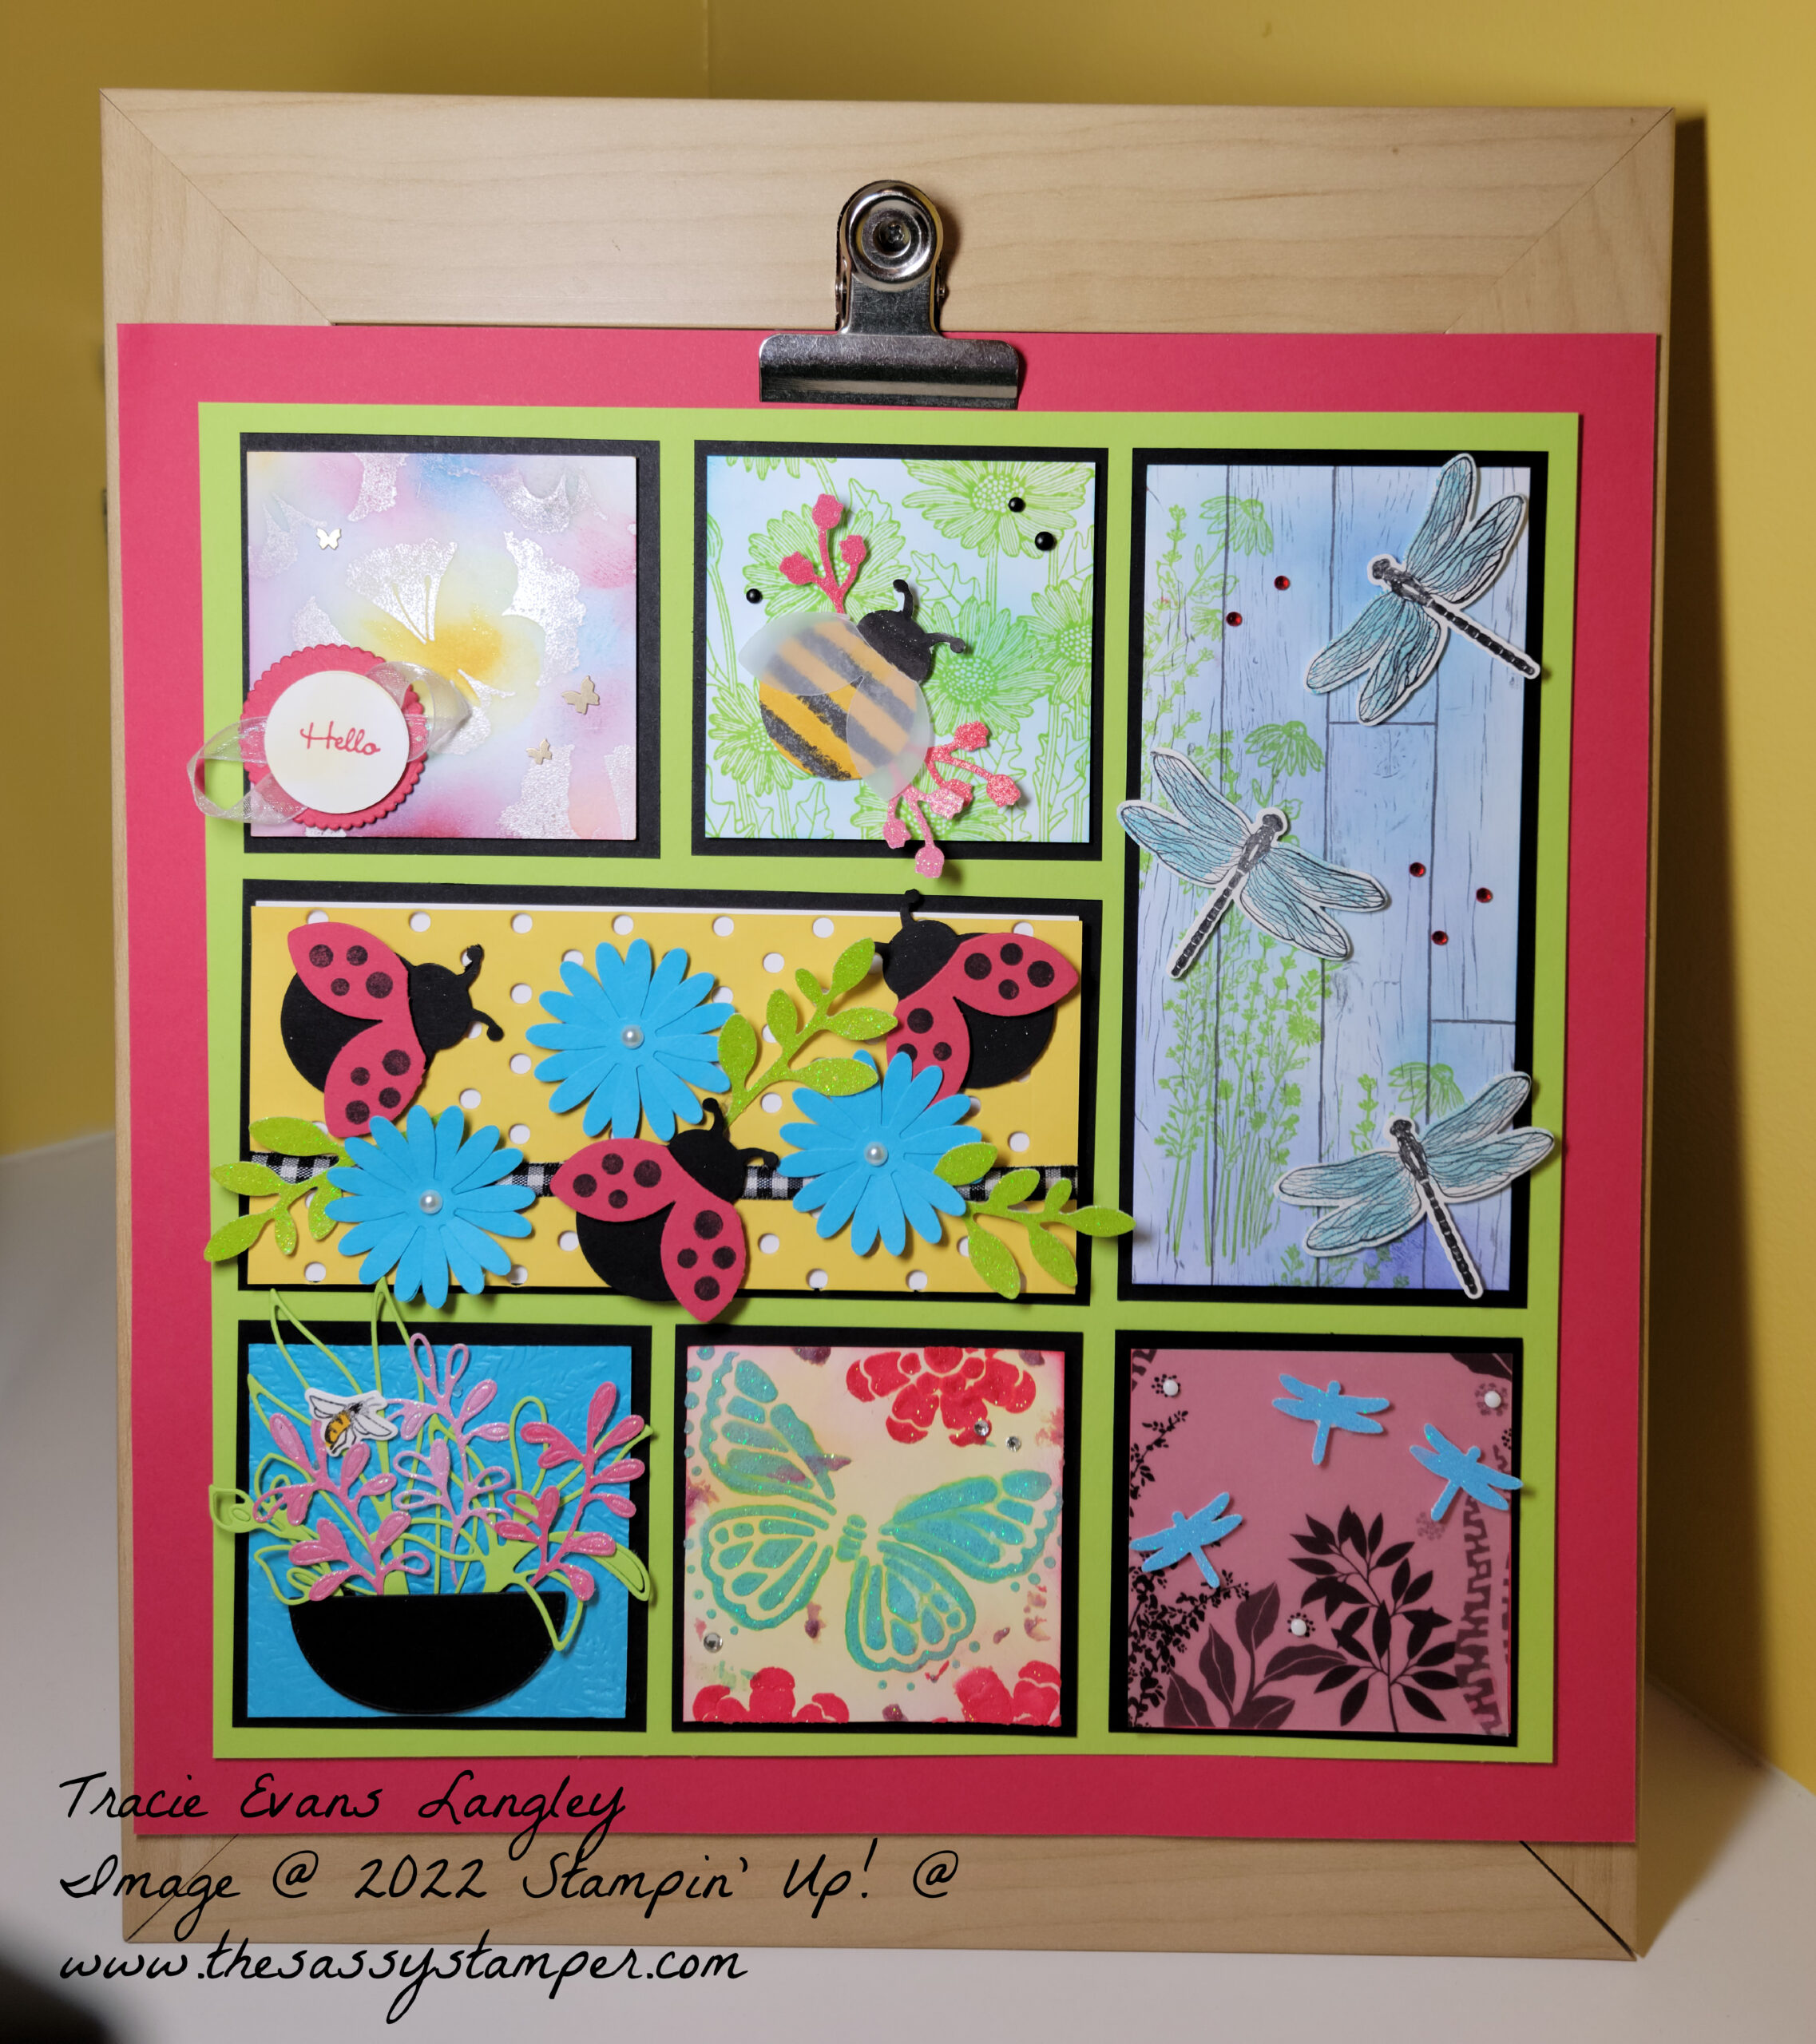
Well, I just couldn’t decide on on set or bug, so I sharing a sampler I created as at the request of one of my customers. She wanted something she could put out during the summer besides her 4th of July one. I think this one definitly fits the bill. I was a slow process as it uses products from three different SU catalogs, the 2022 January to June Mini, the 2022-2023 Annual Catalog AND you get a sneak peek at an amazing new bundle from the 2022 July to December Min. I don’t think I have ever used products from this many cattys on a single project.
The basic measurements for this particular sampler are:
- Sweet Sorbet 12 x 12
- Parakeet Party 10 3/4 x 10 3/4
- 5 Basic Black squares for layering 3 1/4 x 3 1/4
- 3 pieces of Basic White 3 x 3
- 1 piece each of Tahitian Tide, Sweet Sorbet and Lovely Layers Vellum
- 2 Basic Black pieces for layering 3 1/4 x 6 3/4
- 1 piece each of Basic White, Daffodil Delight and Heart & Home DSP 3 x 6 1/2
You will also need the following for die cutting and punching
- 2022-2024 In Color Glimmer Paper
- Perfectly Penciled DSP
- Basic Black
- Shimmery White
- Sweet Sorbet
- Tahitian Tide

The first butterfly square uses an emboss resist technique and the Amazing Silhouettes stamp set along with white Embossing PowderBlending Brushes, Daffodil Delight, Sweet Sorbet & Tahitian Tide ink. I finished it off with the little hello tag and a few inches of White Glittered Organdy Ribbon. This technique is SO easy. Simply stamp your images in VersaMark, apply White Embossing Powder and heat emboss. Use Blending Brushes, starting with your lightest to darkest color to apply the ink. Don’t forget to gently wipe away excess ink from the embossed images with a facial tissue.
The second bumblebee square is super quick and easy! I stamped the flowers from Daisy Garden in Parakeet Party then used a Blending Brush to add the Tahitian Tide. I then created the bumblebee by punching out a piece of Perfectly Penciled DSP using the Ladybug Builder Punch and the wings out of Vellum cardstock. I then used the dark Daffodil Delight Blends to color in the yellow stripes and a Basic Black Stampin’ Write Marker to color in the head and antennas. The little flower are made from Sweet Sorbet Glimmer Paper and punched using the Bough Punch. The square is assemble using Dimensionals.
The large dragonflies square goes together quickly as well. I stamped the flowers from Dragonfly Garden onto the piece of Heart & Home DSP in Parakeet Party and then used Blending Brushes and Starry Sky and Tahitian Tide ink to add more color. The dragonflies were stamped in Memento Black Ink and Tahitian Tide onto Shimmery White cardstock, then punched out with the Dragonfly Punch. I did add a little Wink of Stella to the wings and attached the dragonflies with Mini Dimensionals. I finished it off some Red Rhinestones Basic Jewels.
The fourth square was inspired by a card made by a fellow NC Demo for the Annual Catty Swap by Mail that I hosted in May. I love the layering created with the Dots & Spots Die. This was a really basic piece to make. I just stamped and punched!
The next square features the Splendid Thoughts Bundle that will be available next week in the July to December Mini. I also used the Fern 3D Embossing Folder. I did stamp and then color the little bee, but the rest of this square was die cut and then assembled with Mini Dimensionals and Glue Dots. I think this is such a unique piece and am excited to create more projects with this very versatile bundle!
The second of my butterfly squares was created using the Butterflies & Flowers Layering Decorative Masks, Shimmery White Embossing Paste and Tahitian Tide and Sweet Sorbet Reinkers.
The final little dragonflies square was the most simple of all! I just layered Lovely Layers Vellum onto the 3 x 3 Sweet Sorbet Square and punched the little dragonflies out of the Glimmer Paper. I attached the dragonflies with Mini Dimensionals and added a few of the Classic Matte Dots.
Thank you for letting me bug you for a few minutes this evening. I hope I have inspired you to create your own Cute as a Bug projects. Please contact me if you have questions or would like to order any of the products I have used. I wold love to help you!
Now, let’s buzz on over to see what Tonya Bowers has created! This is her first blog hop with us! I know she did something great!
Thank you again for joining us! I hope you will hop along with us again next month
Happy Stamping!


So cute and all those bugs
Thank you!
Tracie, I am going to have to try one of your samplers. This is so cute. Thanks for sharing.
Thank you! I can’t wait to see what you make!
What a great sampler for the summertime! I love all the different “bugs” you used!
Thank you!
Tracie, I always love your samplers. Each panel tells its own little story. You always amaze me with your creations
Awww. Thank you, Toni! I do love to make them.
I love the dragonflies on the wood DSP (Heart & Home). So pretty!
Thank you, Amanda! I have to remind myself that it is okay to stamp on DSP. LOL
I love your sampler! You always make such great ones. Great directions as well. Thanks for sharing.
Thank you, Jo Anne! I had so much fun making it.