
 Good evening and welcome to our last NC Demos Blog Hop of 2025! This month we are ringing out the old year and and welcoming 2026 with some bright and fun projects full of bling! Our projects could be cards, banners, decor pieces, gift bags, tags – ANYTHING as long as long as it had sparkle and bling!
If you are just starting here be sure to hop all the way around and see what our friend, Laurie Meier has to share. I know it is bling-tacular and will totally inspire you!
I had planned on making a birthday card to share, but then changed my mind after I created this scrapbook page as part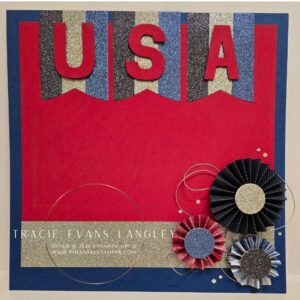 of a yearly project I do with my friend, Susi. Each year I design a single page for each month of the year that she then turns into a scrapbook/photo calendars for her sisters. It is always a fun, if a bit stressful process at times as we always seem to run out of time for her to finish before Christmas. The upside is that my creative level seems to increase with the time constraints and stress. This page for July, the last page to be created, is definitely a product of my procrastination, but I love it and so did Susi!
Here are the basic measurements for the page:
Cardstock:
- Blue Berry Bushel 12″ x 12″
- Real Red 8 1/2″ x 11 and scrap for the letters
DSP for the Lollies:
- Peaceful Garden DSP 3″ x 12″
- Regals 6″ x 6″ DSP Blue Berry Bushel 3 @ 3″ x 6″
- Regals 6″ x 6″ DSP Real Red 3″ x 6″
Peaceful Garden 12″ x 12″ Glimmer Paper
- Silver 2″ x 11″
- 1 of each color for the pennants: 1″ x 12″
- Scraps for the 1 1/4″ circles on the lollies
You will also want to make some 1 1/4″ circles with chipboard or cardstock scraps to help secure the lollies. I used the packaging that comes in our Dimensionals.
Here are the basic instructions for making lollies.
- Use the Simply Scored or scoring blade on the Paper Trimmer to score every ½” on the piece of 3” x 12” DSP. Then cut the 3” x 12” piece of DSP in half making it 2 pieces that are 1 ½” x 12”. This creates the larger lolly.
- Gently fold the DSP back and forth into mountain and valley folds. Think about how we folded paper into paper fans as children.
- Attach the two pieces of DSP together, then form a circle using hot glue. Using hot glue for this part of the project will ensure a long life for your lolly.
- Place a glob of hot glue onto a Silicone Craft Mat. Push one of the folded DSP circles flat onto the glob. Hold it for a few seconds. Add more hot glue to the top of the lolly and cover with a chipboard circle. Let the hot glue cool.
- Repeat steps 1 to 5 for the smaller lollies. You will cut the 3″ x 6″ pieces of DSP into 1″ x 6″ pieces after scoring.
- After the hot glue is cool, this will only take a minute or two, pop the lollies off the Silicone Craft Mat, add a dab of hot glue to the backside and attach another chipboard circle.
One fun tip to share before I go! I used a packing label to help create the pennants. I simply took of the backing and attached the strips of Glimmer Paper to the adhesive. I trimmed off the extra adhesive from around the edges then ran the piece through my Stampin’ Cut & Emboss Machine using a Party Banner Die. I love how blingy and fun these turned out and will definitely be creating more pennants for my banners with this technique!
Thank you for taking time to stop by and let me share my scrapbook page. Please contact me if you have questions or would like to add any of the products I used to your personal crafting stash. I would love to help you!
Well, I will say goodbye until next year, but please come hop along with me to see what Tina Lesson has made this month. I know it will be fabulous!
Stay Safe & Crafty!

 December Blog Hoppers
Tina Lesson
Toni Campana
Amanda Rhodes
Frances Wagner
Kelly Taranto – The Late Night Stamper
Laurie Meier
Tracie Evans Langley – the Sassy Stamper
Product List
![Party Dies Bundle [ 165265 ]](https://assets1.tamsnetwork.com/images/EC042017NF/165265s.jpg "Party Dies Bundle [ 165265 ]")
![Simply Scored [ 122334 ]](https://assets1.tamsnetwork.com/images/EC042017NF/122334s.jpg "Simply Scored [ 122334 ]")


![Tear & Tape Adhesive [ 154031 ]](https://assets1.tamsnetwork.com/images/EC042017NF/154031s.jpg "Tear & Tape Adhesive [ 154031 ]")
![Real Red 8-1/2" X 11" Cardstock [ 102482 ]](https://assets1.tamsnetwork.com/images/EC042017NF/102482s.jpg "Real Red 8-1/2\" X 11\" Cardstock [ 102482 ]")
![Peaceful Garden 12" X 12" (30.5 X 30.5 Cm) Glimmer Paper [ 165929 ]](https://assets1.tamsnetwork.com/images/EC042017NF/165929s.jpg "Peaceful Garden 12\" X 12\" (30.5 X 30.5 Cm) Glimmer Paper [ 165929 ]")
![Peaceful Garden 12" X 12" (30.5 X 30.5 Cm) Designer Series Paper [ 165917 ]](https://assets1.tamsnetwork.com/images/EC042017NF/165917s.jpg "Peaceful Garden 12\" X 12\" (30.5 X 30.5 Cm) Designer Series Paper [ 165917 ]")
![Regals 6" X 6" (15.2 X 15.2 Cm) Designer Series Paper [ 165304 ]](https://assets1.tamsnetwork.com/images/EC042017NF/165304s.jpg "Regals 6\" X 6\" (15.2 X 15.2 Cm) Designer Series Paper [ 165304 ]")
![Holographic Resin Dots [ 165598 ]](https://assets1.tamsnetwork.com/images/EC042017NF/165598s.jpg "Holographic Resin Dots [ 165598 ]")
While I’m not a scrapbooker, I love the design of this page 🙂 I remember you telling me about doing this monthly project with your friend, and this is definitely a great one to wrap up the year. I have the pennant dies and need to find more ways to use them, for sure.
Tracie, I love that your collaborate with your friend. Your card is pretty with lots of sparkle and the cute lollies. Thank you for sharing.
Love the scrapbook page and the bling
gorgeous scrapbook page, with certainly a lot of bling!
Great scrapbook page! I need to get back to my scrappin’. I put my Christmas cards I received each year in a SMASHbook and may do that before the new year & blog about it! Thanks for inviting me to hop along!
I love the idea of incorporating bling into projects for 2026 – it sounds like a fun theme!
Tracie – What a wonderful scrapbook page and a great way to collaborate with your friend. The page truly sparkles with the lollies!
Thank you, Laurie! It was SO much fun to make and will definitely inspire some future projects!