Welcome to our NC Demos April Blog Hop! If you have already been hoping along with us, maybe you saw Nedine DuPree’s fantastic post, you know that since Spring is in full swing, our April theme is “It’s a Spring Thing!”
Our projects could be about ANYTHING to do with Spring! Flowers, birds, Mother’s Day, Father’s Day, Graduations, Wedding or Baby Showers. Any of the things that make us think of Spring events, holidays or just the lovely weather!
I decided I would share the Spring Sampler I made with a few of my customers in early March (and hope to make with more of them when the quarantine is lifted. Look for a Get a Sample Day on my calendar hopefully starting in mid May.
I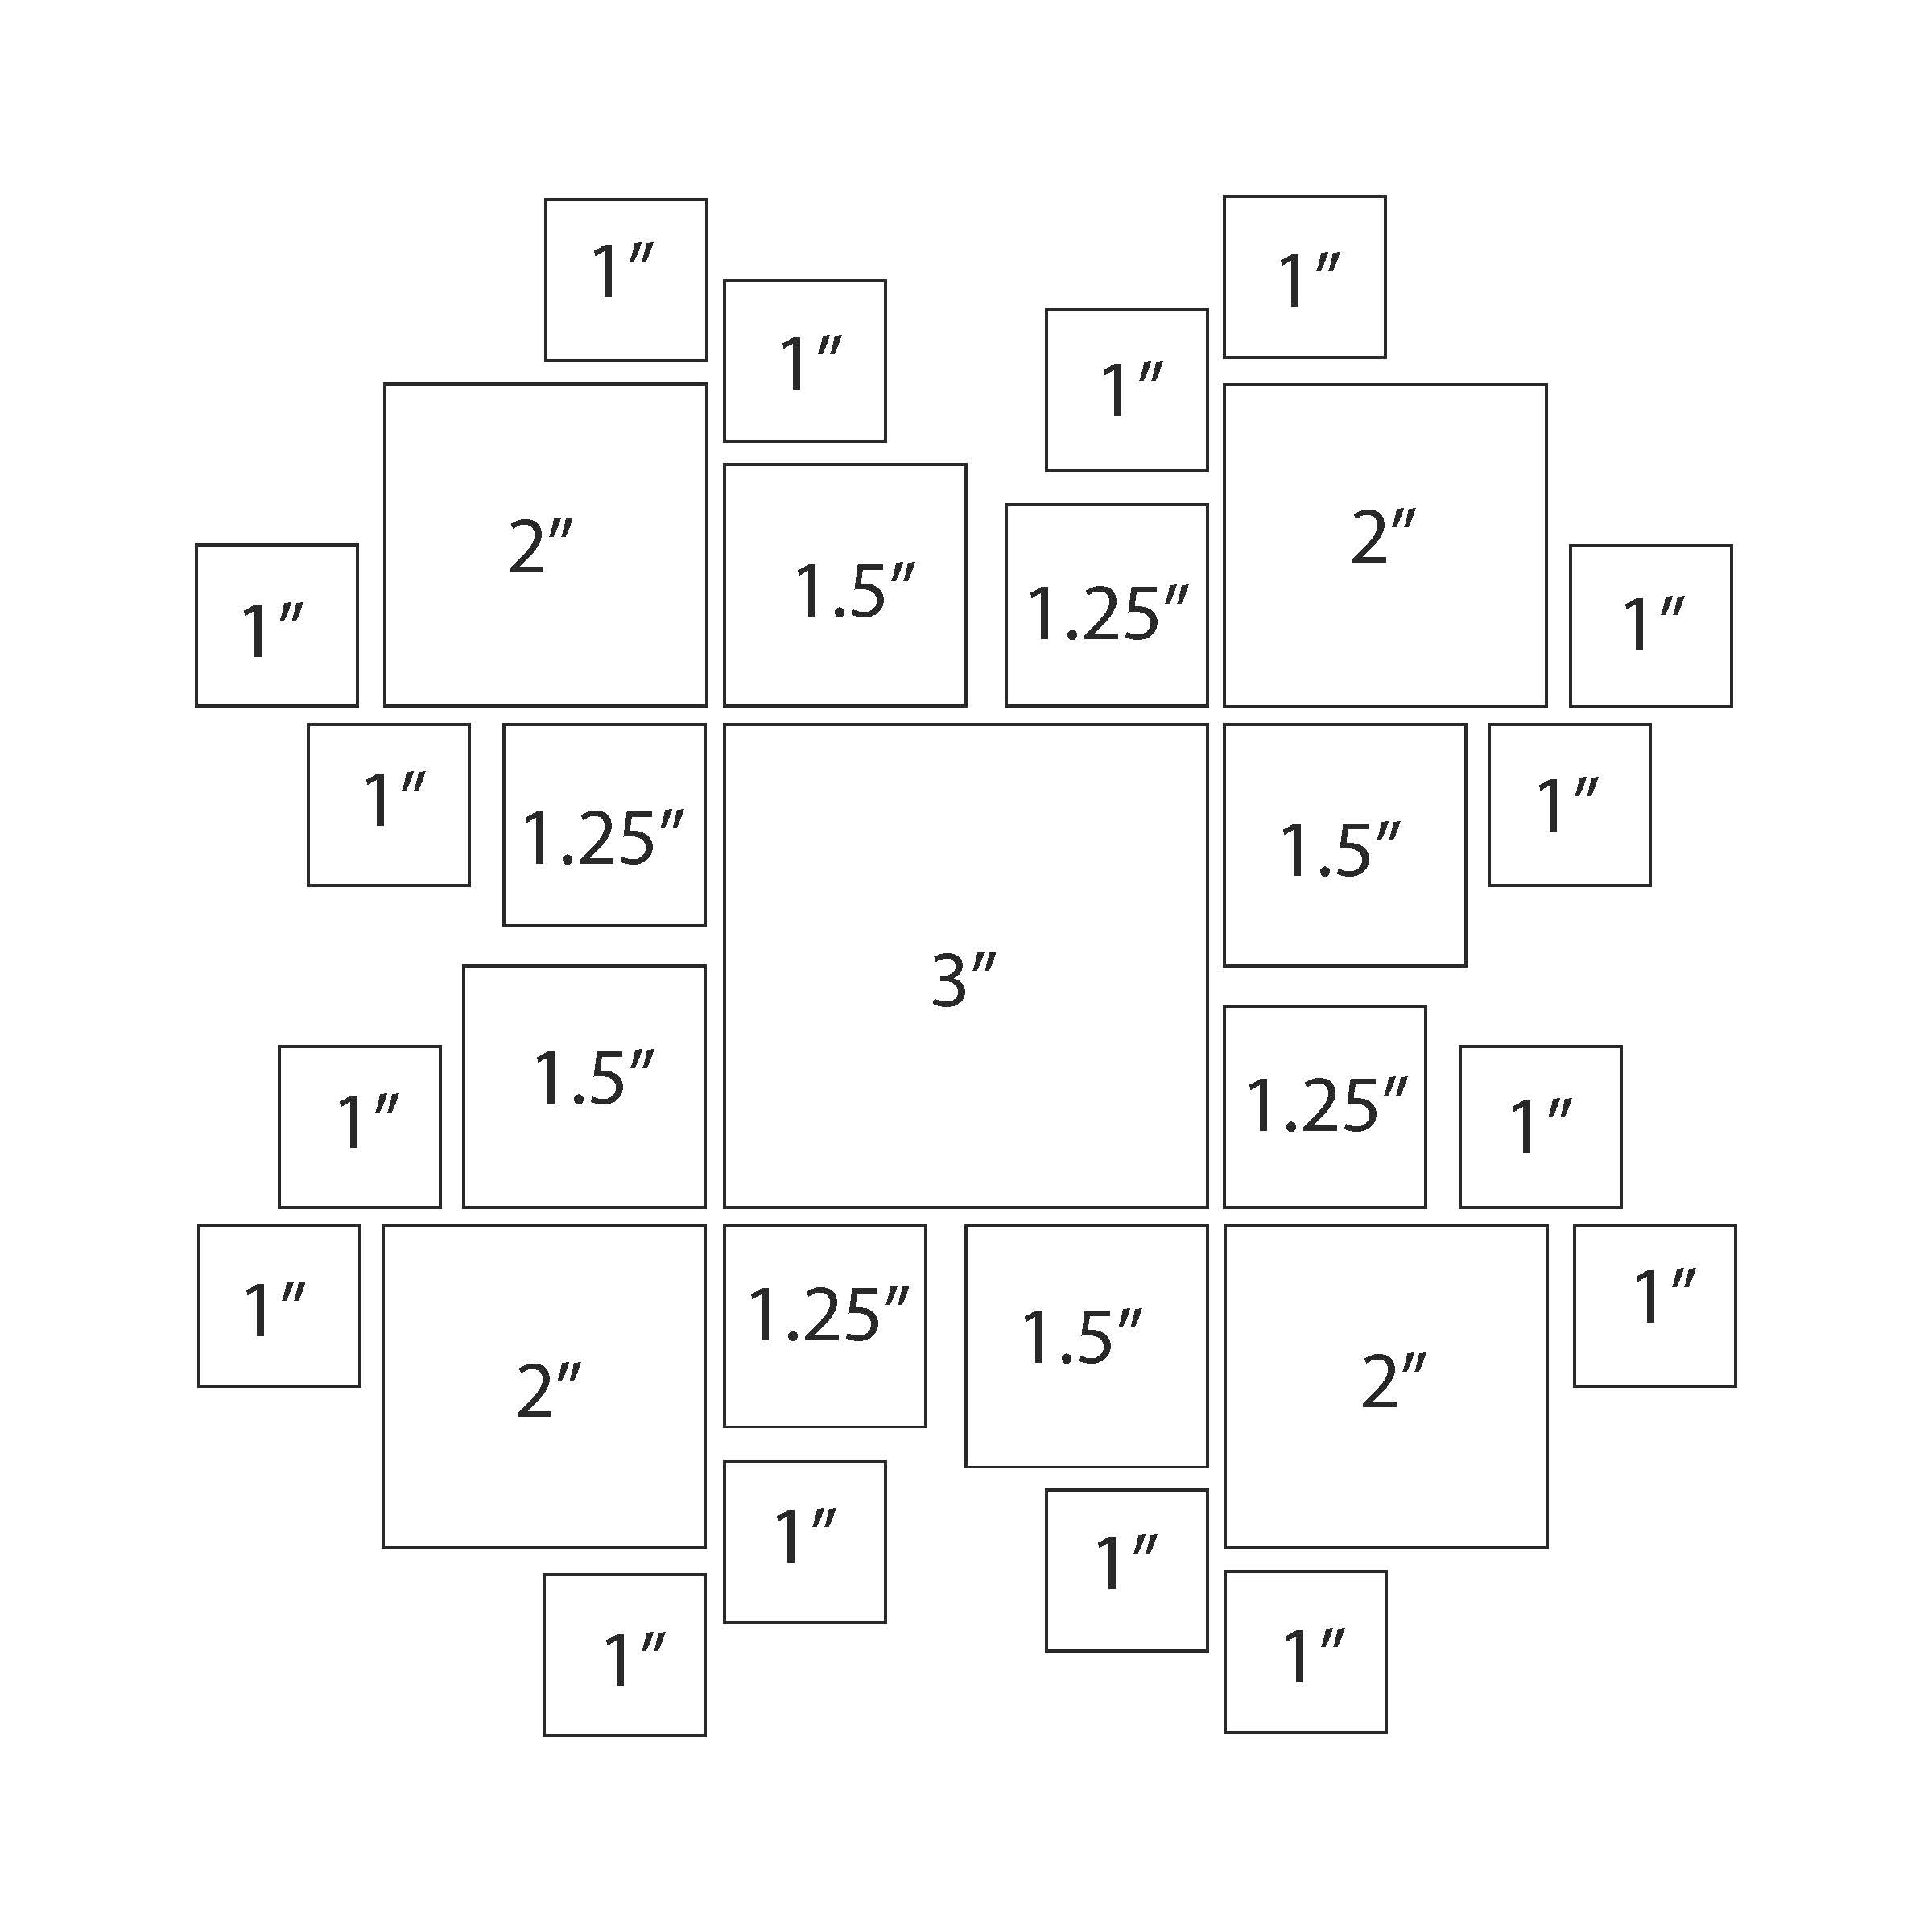 used the template that Sara Douglas shared with us at OnStage in Germany in November. I love samplers and her template reminds me of the starburst quilts. I started by printing the template on a 12×12 piece of Whisper White cardstock. I then cut all my squares. Those measurements and quantities are:
- One 3 x 3
- Four 2 x 2
- Four 1 1/2 x 1 1/2
- Four 1 1/4 x 1 1/4
- Sixteen 1 x 1
For this particular sampler all of the base layers are attached together with Dimensionals and the measurements are:
- Flirty Flamingo 12 x 12
- Old Olive 11 1/4 x 11 1/4
- Whisper White 11 x 11I trimmed the Whisper White piece down after I printed it. I Old Olive and the Direct to Paper Technique to create my distressed look.
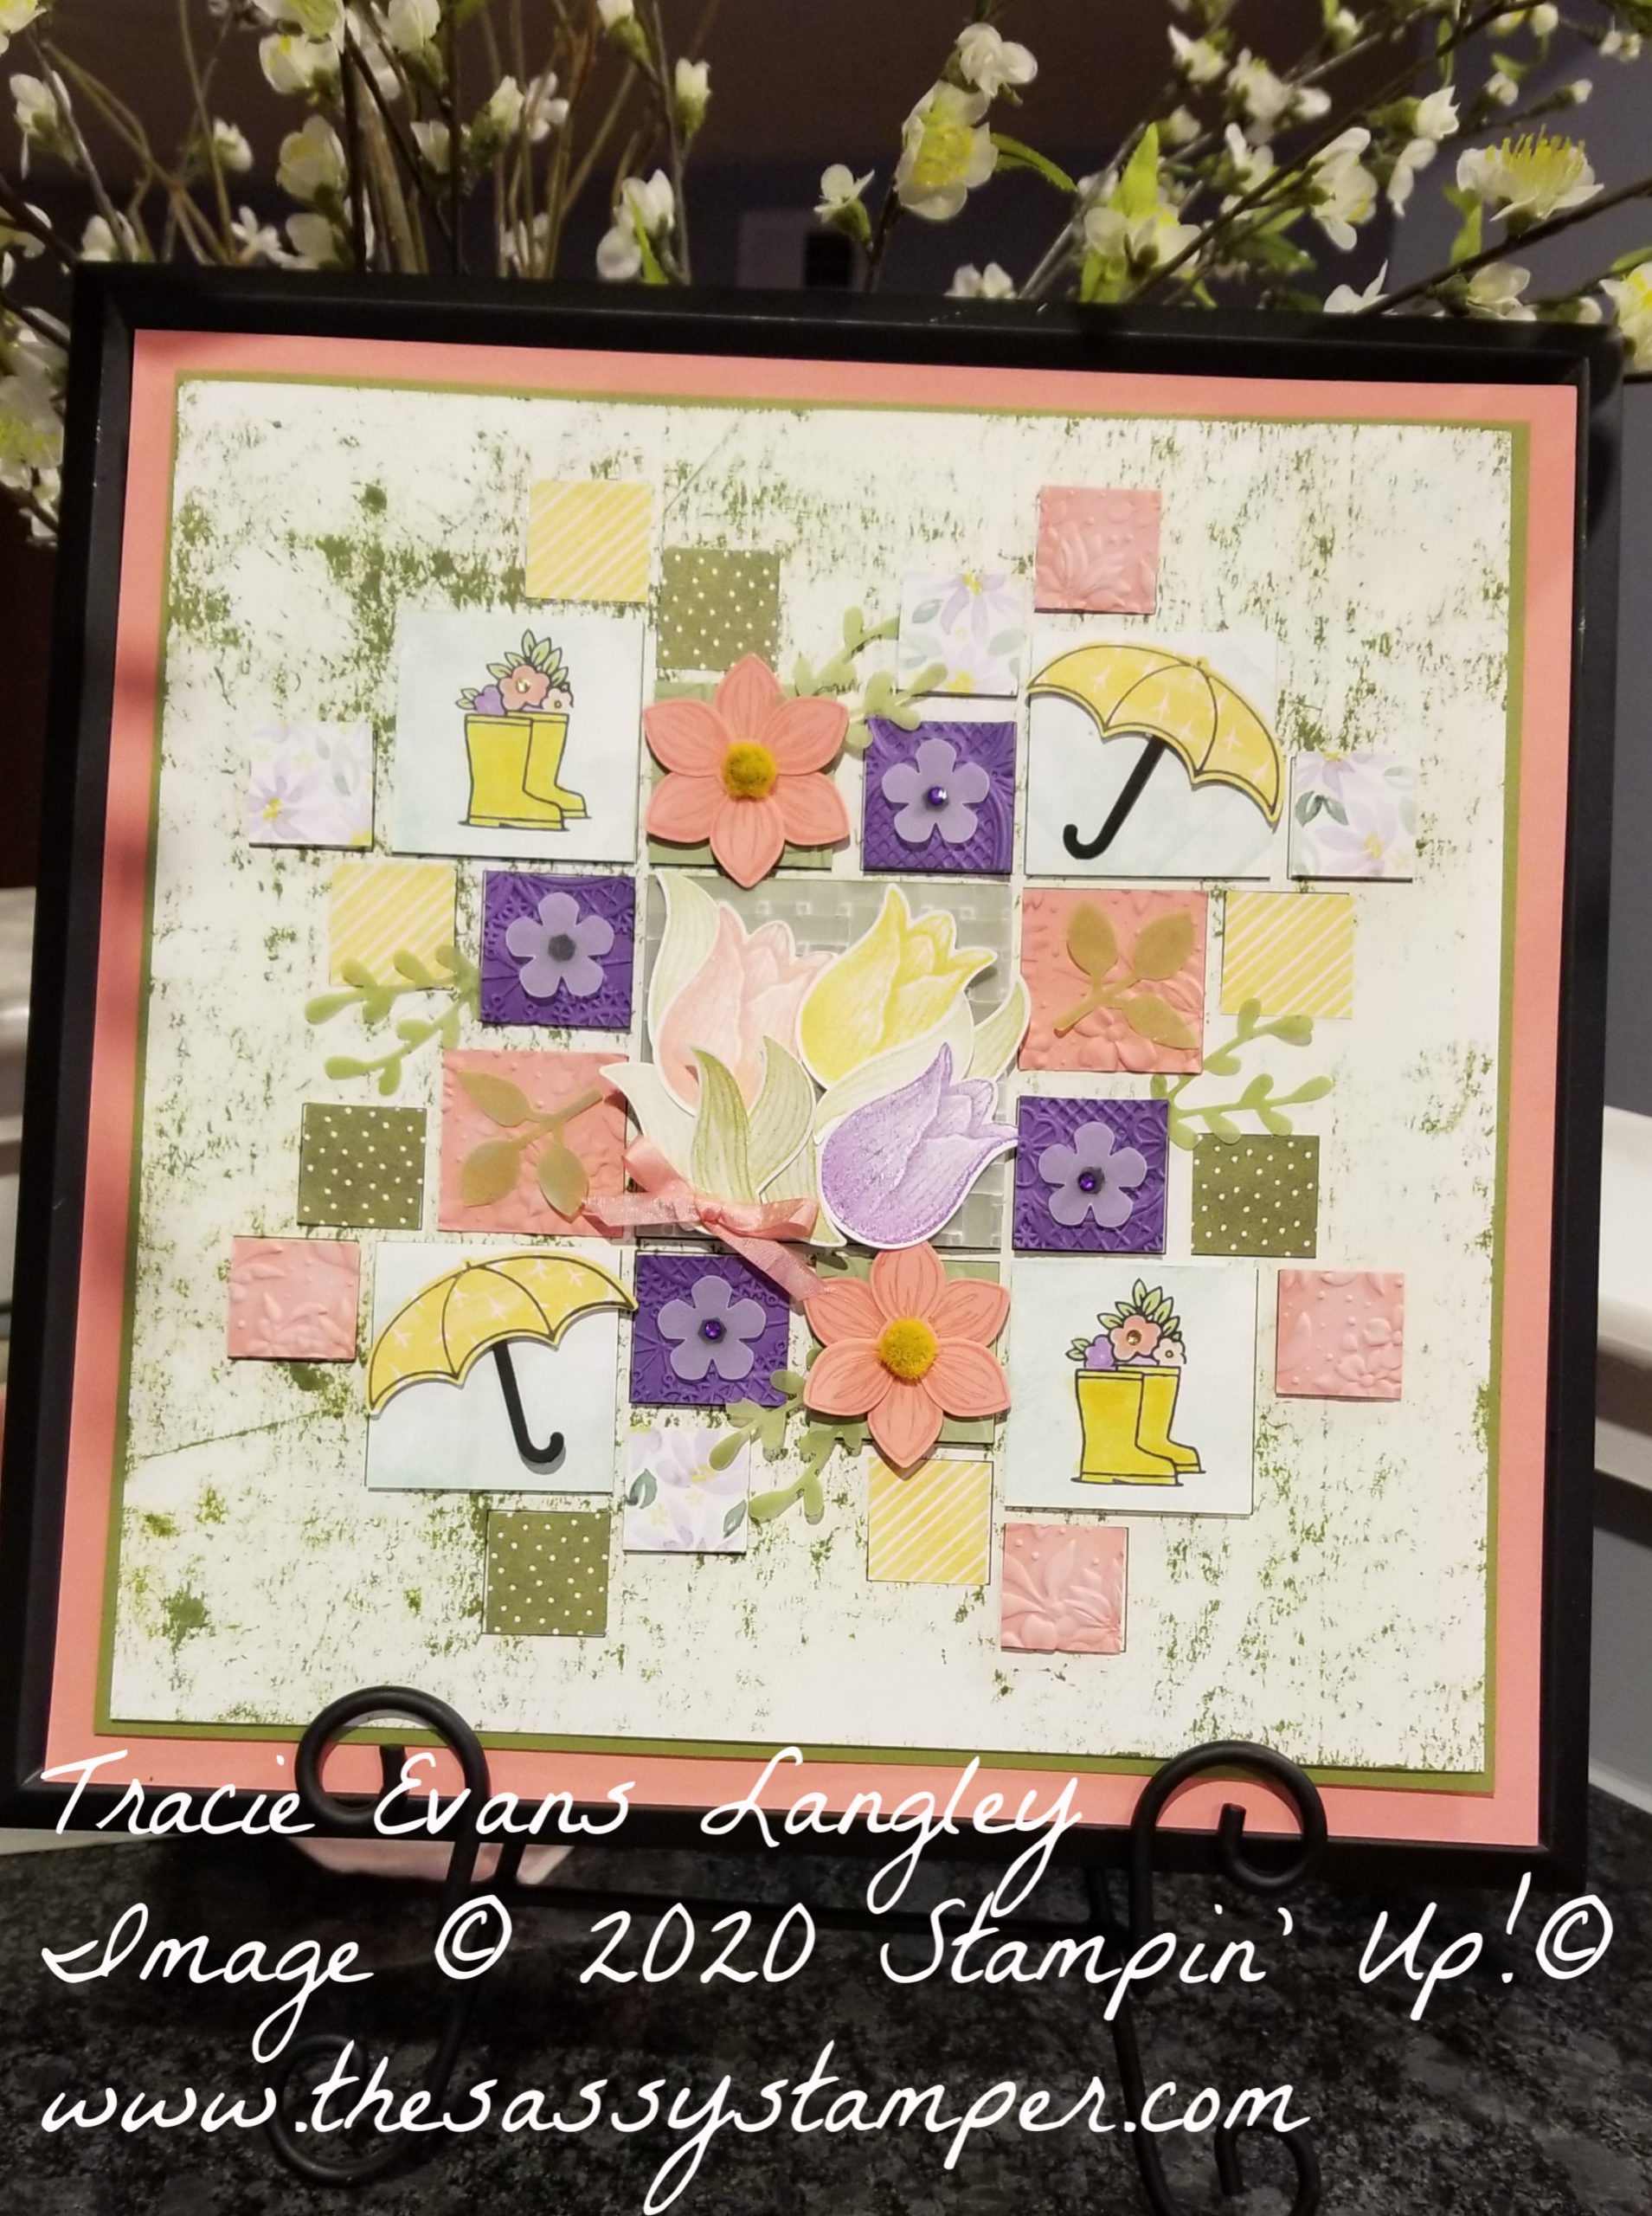 I built my squares starting with the tulips in the middle and working out from there. I stamped and punched my tulips and leaves then attached them with varies sizes of Dimensionals to a 3×3 piece of Vellum that I embossed with the Basket Weave 3D Embossing Folder. I then attached the Vellum to a 3×3 piece of Old Olive cardstock using Tear & Tape. I colored the Whisper White Crinkled Seam Binding Ribbon with the Dark Flirty Flamingo Blends and attached it with Tear & Tape.
After finishing my tulips, I moved on to creating the backgroud paper for my umbrella & rain boot squares. I did this by inking up a Clear D Block, then laying the block onto Whisper White cardstock. You need to leave it for about a few seconds so that the ink soaks into the paper. Then I stamped my rain boots and flowers in Memento ink using the Stamparatus and colored them with Blends. I also stamped the umbrellas with Memento ink onto pieces of DSP from Bird Ballad and punched it out with the Umbrella Builder Punch. I used mini Dimensionals to attach the umbrellas.
I then moved on to stamp, punch and assemble the Flirty Flamingo flowers using the Perennial Essence Bundle. This has been one of my favorite suites this year! I love the little fuzzy Daffodil Delight Floral Centers. They are SO sweet and I am more than a little obsessed with the Vellum. I love using the Old Olive sheets with the Leaf and Sprig Punches like I have done on this sampler. If you don’t have the Vellum or Floral Centers, DON”T WAIT! Once they are out of stock they will be gone forever! I did attach the layers of my flowers together with Multipurpose Glue then added them to the Pear Pizzazz 1 1/2 x 1 1/2 squares using a Dimensional. My Vellum leaves are attached with SNAIL.
The little white Vellum flowers using the Small Bloom Punch were a last minute addition. This punch was from Sale-A-Bration, but will be available again starting in June with the launch of the 2020-2021 Annual Catalog! Yay! I attached the flowers using the Mini Black Dimensionals before adding the Gorgeous Grape rhinestones from the Noble Peacock Suite. I think he Dimensionals give the flowers a little extra pop!
Finally, I decided which DSP and cardstock I would be use and cut all of the 1 x 1 squares. I used a dauber and Whisper White Craft Ink to add a little extra depth and texture to the Flirty Flamingo squares after embossing them.
I assembled all of my sampler squares directly onto my template. This makes it SO quick and easy with everything even and straight! I used a variety of ways to attach the squares, Multipurpose Glue, Mini & regular Dimensionals to give the piece more depth and interest. The final touch was to attach the little Vellum sprigs with Glue Dots.
If you would like to easily create your own starbust sampler using the printed template of your own please let me know. They are $3 each (plus shipping) and can be printed on ANY of the Stampin’ Up! 12×12 cardstock, colors. If you live in the Raleigh, NC area you can also pick them up for the Stamp Pad.
If you haven’t already done so come hop on along with me and check out what Jo Anne Hewins has created this month. She is such an inspiration to me!
Thank you for letting me share my Spring Thing with you! I hope I have inspired your own projects. If you need help, have questions or want to order any of the fun products I used please let me know. I would love to assist you!
Stay Safe & Crafty!

Amy Kinler
Nedine DuPree
Tracie Evans Langley
Jo Anne Hewins
Tina Lesson
Toni Campana
Sue Stapp
Ariel Matera
Laurie Meier
Sue Root
Product List


Hello Tracie! How cute is your project? I’m loving the sampler and now I have yet another project added on my list of “must-try’s”! Thank you for always inspiring me!
Awww, thank you, Nedine! Samplers are a blast and I really love this one in particular! Be prepared to be hooked after you make your first one!
What an amazing card
Thank you, Tina!
Wow! This looks so detailed. You made a quilt. I love it. This may be the way I finally quilt. I can not sew but I can make a card.
I can’t sew at all, Amy! My hubby sews on buttons for me! LOL So, this is as close to quilting as I will probably ever get! Give a sampler a go! They are addictive!
WOW, Tracie! This is amazing, all the color , textures and embellishments work so well together. I would love to try this myself. Your detailed instructions will definitely come in handy
So happy to inspire you, Toni! I want to see your sampler when you finish it!
OMG! Your sampler is fantastic. I love everything about it!
Thank you, Jo Anne!
WOW that’s a lot of cuttin’ and pastin’!
Looks great though. I’ll have to give it a try. I love those tulips in the center.
Sue Stapp
Thank you, Sue! I do love all my samplers, but this one is a favorite!
Tracie, this is stunning! What a labor of love! There is so much to look at, it seems I find something new each time. Great job and a beautiful project!
Can I just say WOW!?!? Your sampler is simply gorgeous. The colors you chose and the details that you included are amazing. I think I have confessed this before — I have never made a sampler – sad, isn’t it? Well – You have definitely inspired me! Thanks so much for sharing!
Thank you, Laurie! You are so sweet. Samplers are SO much fun! Once you try it you will be hooked!