Hello and welcome to this month’s NC Demos Blog Hop! We are SO glad you are here! If you stopped by to see Kelly Taranto’s awesome post, you know that this month’s theme is Two of a Kind. We were to create one card layout then make two cards using this layout with two different stamp sets and color schemes, different DSP and embellishments, too!
I love this idea as I hate making more than about four identical cards. So, even if they are all birthday, thinking of you, etc..using the same layout, but I change up the stamp sets, DSP, etc..I feel like I am making different cards. Also, it is great if I see a layout that I love and want to try, but don’t have some of the supplies used. It is a great way to case and put your own touch to a project!

I created the layout I am using for one of the Card Kits our guests could add-on to their
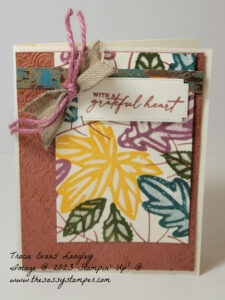
World Card Making Day registration next Saturday. I did case this a bit from one of the samples in the September to December Mini Catty. My original card uses items from the Autumn Leaves Suite Collection. I love the color combo of this card as well as the simple and easy to duplicate layout. I will definitely be saving both ideas to use for future projects.
Here are the basic measurements and directions to create this card, or one inspired by it yourself:
- Very Vanilla 5 1/2 x 8 1/2 and scored at 4 1/4
- Very Vanilla 3 x 4 1/2 & scrap
- Copper Clay 4 x 5 1/4
- Oxidized Copper DSP 1/2 x 4
- In Color Twine 8 inches
- Natural Ribbon 3 inches
- Randomly stamp the leaves onto the Very Vanilla cardstock in this order: Large leaf in Crushed Curry. Medium Leaf in Moody Mauve, clean the stamp then stamp in Pretty Peacock. Double leaves in Mossy Meadow. Medium stem stamp in Copper Clay to fill in the white areas.
- Stamp the greeting onto die cut tag.from the Autumn Leaves Dies in Copper Clay.
- Emboss the Copper Clay piece with the Distress Tile 3D TF and apply Crushed Curry Ink using the Direct to Paper Technique.
- Fold the Mood Mauve Twine in half and tie around the Natural Ribbon. Cut the loop on the Moody Mauve Twine.
- Attach the Copper Clay piece to the Very Vanilla cardbase with Dimensionals. Attach the Very Vanilla stamped piece and the Oxidized Copper piece with Multipurpose Glue. Attach the greeting with Dimensionals.
- Finish off the card by attaching the bow to the card using Tear & Tape or a very strong adhesive.
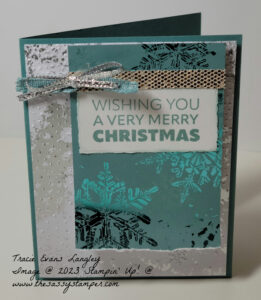
 For my second project using the same layout as the first, I wanted to show how you can take DSP and create the same card. The Snowflake Magic DSP was perfect for this. This card went together SO quickly and easily. It took me longer to decide which piece of DSP was going to be which layer than it did to make the card!
Here are the measurements and directions for this card:
- Lost Lagoon 5 1/2 x 8 1/2 and scored at 4 1/4
- Snowflake Magic DSP 3 x 4 1/2 & 4 x 5 1/4
- Basic White 3 x 2
- More Dazzle Specialty Paper 1/4 x 3
- Gold & Silver Trim Combo Pack 8 inches
- Lost Lagoon Bordered Ribbon 3 inches
Once you have cut your cardstock, this card goes together in a flash!
- Start by die cutting the Basic White piece of cardstock with the Deckled Rectangles Dies and then stamp the greeting from the Joy to You stamp set in lost Lagoon onto the Basic White piece of cardstock. Add a little color to the edges of the greeting piece with a Blending Brush and Lost Lagoon ink.
- Use the Snowflake Sky 3D Embossing Folder to emboss the white and silver piece of DSP. Attach layer onto the Lost Lagoon cardbase with Dimensionals.
- Gently tear the bottom of the 3 x 4 1/2 inch piece of DSP and attach to the while piece of DSP by adding Dimensionals only to the top of the DSP. Then use a Bone Folder to curl the bottom of the DSP.
- Use Multipurpose Glue to attach the greeting and More Dazzle Specialty Paper.
- Tie a bow around the Lost Lagoon Bordered Ribbon with the Silver Trim.
- Finish off the card by attaching the bow with Tear & Tape.
Thank you for letting me share my Two of a Kind cards with you. I hope that you will now find a layout you like and create a great project using your own stamps, ink and paper! Please contact me or comment below if you have any questions or would like to order any of the products I have used today.
If you haven’t already done so, come hop along with me to see my friend, Toni Campana’s project for this month. She always does fantastic!
Thank you again for taking time to stop by. Until next time..
Happy Stamping!

September Blog Hoppers
Toni Campana
Tina Lesson
Kristine Vicente
Ronnie Johnson
Laurie Meier
Kelly Taranto – The Late Night Stamper
Tracie Evans Langley, the Sassy Stamper
Product List


So fun! I love the two suites of product you used, Tracie! Cute card design, too. Thanks for sharing and for coordinating the hop!!
Awww, thank you, Kristine! I always love to see what you all create each month!
Awesome cards, Tracie! I love the layout, and the designs that you used on each card are great! Thanks for such a fun theme for the month’s blog hop!
Aww, thank you, Laurie! I am so glad you liked the theme. One of our conversations sparked the idea for it, so thank you for the inspiration!
So Pretty
Tracie, great cards. What a nice layout something I would not have thought of but love.
Thank you, Ronnie!
Great cards, Tracie. I’m really looking forward to trying out all the layouts shared here in the hop this month. This was a great theme!
I am so glad you enjoyed the cards and the theme. I look forward to seeing your inspired cards!
Great layout — and that 2nd card….WOW! That DSP is really stunning. (I think it’s the only one I didn’t purchase…but, now it’s on my list!) Thanks Tracie!
Thank you, Kelly! Yes, you definitely need to add it to your list! It is SO pretty!