
Saturday, November 3, 2018
12 Weeks of Christmas – Catching Up with a Be Jolly Candy Cane Card!
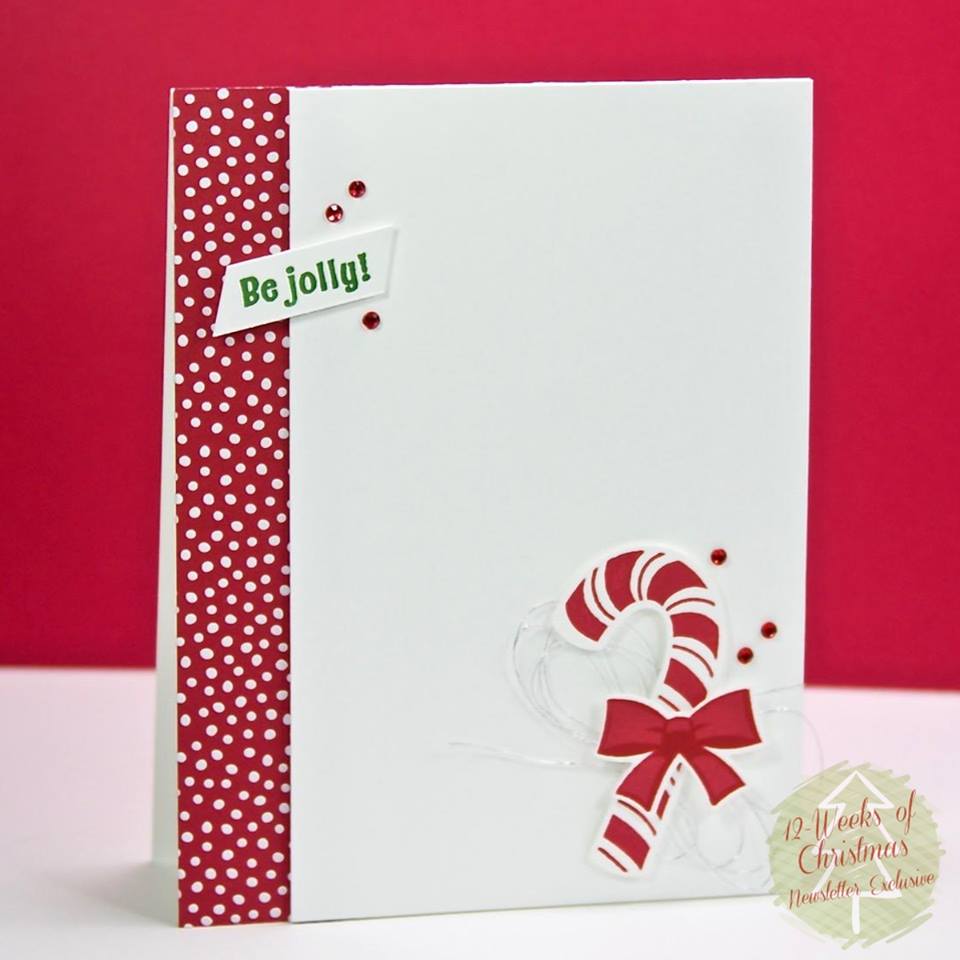
Halloween is over and like you I am wondering where the time has gone and if I will ever get everything done on my to do list before the holidays. Well, here is a cute little card that will make the holiday season a bit more jolly! It is cute, quick and just traditional enough to get everyone is a Merry Christmas mood. Below are all the details for this 12 Week’s of Christmas card.
All images © Stampin’ Up!®
If you have any questions or would like to order any of the products to create this card please don’t wait to contract me. The sooner you get your supplies the sooner you can cross making Christmas cards off your to do list!
Happy Stamping!
![]()
Sampin’ Up! Supplies:
STAMPS – Candy Cane Season Bundle (149927)
PAPER – Whisper White Cardstock (100730), Whisper White Thick Cardstock (140272), Regals 6” x 6” Designer Series Paper (DSP) (146965)
INK – Real Red (147084), Garden Green (147089)
OTHER – Stamparatus (146276), Candy Cane Builder Punch (148011), Take Your Pick Tool (144107), Red Rhinestone Basic Jewels (146924), Silver Metallic Thread (138402), Mini Glue Dots (103683), Mini Stampin’ Dimensionals (144108), Stampin’ Dimensionals (104430), Multipurpose Liquid Glue (110755), Snail Adhesive (104332)
Cutting & Scoring:
- Thick Whisper White Cardstock (“Card Base”) – 11” x 4 ¼”, score and fold at 5 ½”
- Whisper White Cardstock (“Card Front”) – 3 ½” x 5 ½”
- Whisper White Cardstock – ½” x 2”
- Real Red Regals 6×6 DSP – 5 ½” x 1”
Instructions:
- Using Multipurpose Glue, adhere the Real Red Regals 6×6 DSP to the left edge of the Card Base.
- Adhere the Whisper White Card Front with Stampin’ Dimensionals aligning the right edge of the Card Front to the right edge of the Card Base.
- Stamp the Striped Candy Cane image from the Candy Cane Season Bundle using Real Red Classic Ink.
- Next, stamp the bow outline with Real Red Classic Ink then stamp the solid bow image inside the outlined image with the Real Red.
- Punch out the Candy Cane and Bow with the Candy Cane Builder Punch.
- Stamp the “Be Jolly” with Garden Green on the ½” x 2” strip and trim the ends at an angle.
- Adhere the “Be Jolly” with Mini Stampin’ Dimensionals overlapping the DSP and Card Front. HINT: Use 2 stacked Mini Stampin’ Dimensionals under the “Be” and one Mini Stampin’ Dimensional under the “Jolly.”
- On the back of the Candy Cane, add a strip of Snail Adhesive then attach the Silver Metallic Thread. HINT: Wrap the Silver Metallic Thread loosely around 3 fingers, carefully remove, twist, adhere to back of Candy Cane where you’ve added the Snail Adhesive, and hold in place by adding a Stampin’ Dimensional over the Silver Metallic Thread.
- Adhere the Candy Cane with Stampin’ Dimensionals in the bottom right corner of the Card Front.
- Attach the Bow with Mini Stampin’ Dimensionals to the Candy Cane.
- Use the Take Your Pick Tool to adhere the Red Rhinestone Basic Jewels.
- Enjoy