
The very first technique I shared with my Terrific Techies (back then they were my Hostess 10 Club) was the Spotlighting Technique. Nineteen years after first learning this technique I still love it. I love it even more when we have lovely Stampin’ Up! Designer Series Paper, DSP, like the Perfectly Penciled, that I can use instead of having to stamp multiple images. Yes, I will freely admit that I am a lazy stamper! LOL
Please note, I did case this card from a fellow demo on Pinterest, but feel I gave it my own personal touch with the Mesh Ribbon and using Watercolor Pencils.
This card is one that my guests could choose to make as an add-on kit at this year’s Scrappy Stampers’ Getaway. Some of my regulars to the Stamp Pad saw the sample and liked it so much we added it to Stamping is Therapy this month, too! Here are all the directions if you would like to recreate this card or others using your own favorite DSP.
Supplies: 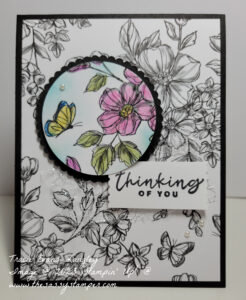
- Season of Chic stamp set
- Balmy Blue & Tuxedo Black Memento Ink
- Layering Circles Dies
- Rectangle Postage Stamp & Circle Punches
- Blender Pen
- Small Blending Brush
- Watercolor Pencils
Cardstock
- Basic Black 4 1/4 x 11 and scored at 5 1/2
- Perfectly Penciled DSP 4 x 5 1/2
- Basic White scrap for the greeting
- Basic Black 3 x 3 for layering
- Metallic Mesh Ribbon 3 inches
- Pearls Basic Gems
- Choose a part of the image on the Perfectly Penciled DSP and use the Circle Punch or a Layering Circles Die to cut it out. Use Watercolor Pencils and a Blender Pen to color in the images in the circle. Watercolor Pencils, a Blender Pen, Balmy Blue ink and a Small Blending Brush were used here. Alternative coloring choices are Blends, Stampin’ Write Markers, and Blender Pens with Classic Ink Pads.
- Stamp the greeting from Season of Chic onto a Basic White scrap and punch the ends with the Rectangle Postage Stamp Punch. Set aside.
- Layer the 4 x 5 1/2 inch piece of Perfectly Penciled DSP onto the Basic Black using Multipurpose Glue.
- Layer the Basic Black scalloped circle over the place you punched earlier with Dimensionals.
- Tuck a piece fo Metallic Mesh Ribbon under the Basic Black scallop and adhere with Tear & Tape.
- Attach the colored circle onto the Basic Black scallop with Dimensionals.
- Attach the greeting with Dimensionals. You may need to layer these for more height depending on where you place your greeting.
- Finish the card by adding Pearls Basic Gems.
Thank you for letting me share this fun and easy card with you. If you have questions or would like to order any of the supplies for this project, please feel free to contact me. I would love to help you!
Stay Safe & Crafty!