Hello and welcome to this month’s NC Demos Blog Hop! We are SO glad you are here. If you didn’t get a chance to see Tina Lesson’s post for this month be sure to hop all the way around a check it out. I know she made something fantastic!
 Our March theme is “Accessories make every project better!” Our projects could be anything, but needed to have AT LEAST two accessories. It is definitely a cases of MORE is MORE! Our accessories could be anything from DSP to ribbon, rhinestones to trim and everything in between!
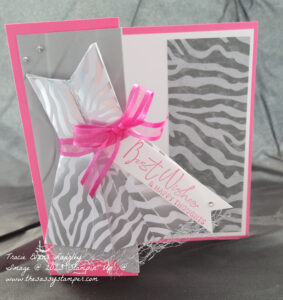
Okay, so I am an accessories and DSP hoarder. I always think I need to save it because I might need it later. Well, this project is the one I have been waiting for! It has all my favorite things! It’s Polished Pink and has animal prints, ribbon, sparkles and a fab dress! What’s not to like about it?
Of course, I started my project by making the dress. I became a bit obsessed with this origami dress idea in 2020 when I was sending out a lot of Card Kits To Go to my customers who were not attending live events due to COVID. Here is the video I created in May of 2020 to share how to create the dress.
I did do a couple of this differently on the dress I am sharing here.
- Instead of pulling the paper out to create the sleeves, I tucked them in and used Tear & Tape to secure them.
- I cut the Metallic Mesh Ribbon in half to give the petticoat two layers. I attached the Mesh Ribbon with Tear & Tape.
- I added additional Tear & Tape to the back of the dress to keep all the folds secure.
I now have a very sassy strapless party dress. Yes, I would totally wear this! It just needs a pair of sparkly shoes!
Here are my measurements and instructions in case you want to create this easy, but stylish card at home:
 easy, but stylish card at home:
- Dress 5 x 5 Like an Animal Specialty DSP
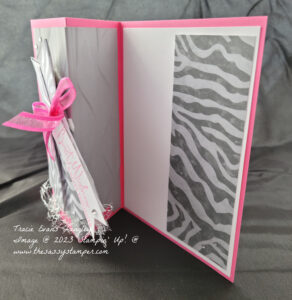
- Polished Pink cardbase 5 1/2 x 8 1/2. Scored at 2 1/8 and 4 1/4
- Smoky Slate 4 x 5 1/4 and scored at 2
- Basic White 4 x 5 1/4
- Like an Animal Specialty DSP 2 x 5
- Basic White scrap for greeting tag
- Ribbon for the bow is 10 inches
- The ribbon for the sash and the Metallic Mesh Ribbon measurements are up to you.
Here is how I created the card itself.
- After cutting and scoring all the cardstock and DSP I attached the Basic
 White 4 x 5 1/4 piece to the Polished Pink cardbase and then attached the Like an Animal DSP to the Basic White piece. I used Multipurpose Glue for both.
 - Next, I used the Essential Tag Punch to create the legs of the Smoky Slate screen. I then embossed the Smoky Slate piece using the Cascading Ruffles 3D embossing folder. I then attached it to the Polished Pink cardbase with Multipurpose Glue.
- Stamp the birthday greeting form Nature’s Prints in Polished Pink and use Paper Snips to create the banner. Attach this piece to the dress with Tear & Tape.
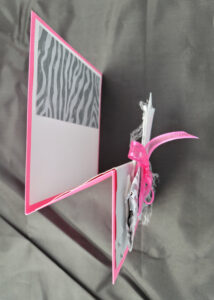
- Attach the dress to the card using Dimensionals.
- Add Rhinestones to the card for a finishing touch.
Thank you SO much for letting me share my project with you. I hope I have inspired you to stop hoarding your accessories and to put them to good use. There is always room for accessories on ANY paper crafting project! If you have questions, want to order any of the products I have shared please feel free to contact me. I would love to help you!
I hope you will now join me as I hop on over to see what my friend, Toni Campana is sharing this month. She is SO creative and always makes something wonderful!
Stay Safe & Crafty!

 Blog Hoppers
Jo Anne Hewins
Tina Lesson
Tracie Evans Langley – the Sassy Stamper
Toni Campana
Laurie Meier
Kelly Taranto – The Late Night Stamper
Tonya Bowers
Product List
NC Demos March 2023 Blog Hop – Accessories Make Every Project Better!


WOW that is one lovely card.
Awww. Thank you SO much, Tina!
Wow, this is impressive!
Thank you, Amanda!
Love, love, love this card! I’ve saved the original video so I can see how to make the dress. I’m putting this project on my list of “must learn how to make”, lol! The colors are perfect as well. And I can totally see you wearing this dress 🙂
Awww, thank you, Toni! I can’t wait to see the projects you create!
Wow Tracie. I love the dress idea and I need to try it. Thanks for the video and the tips. Beautiful card!
Thank you, Jo Anne!
Tracie – GREAT card! I really like the origami dress. It’s super creative 🙂 Thanks so much for sharing. And, I would wear the dress as well 😉
Thank you, Laurie!
Wow! Such a great card!! Love it!
Thank ypu, Tonya!