
Thursday, November 29, 2018
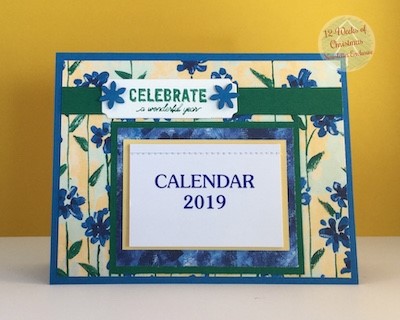
12 Weeks of Christmas – A Calendar Gift Card Reminds Someone You Care All Year Long!
Calendars are a great gift for teachers, administrative assistants or anyone who spends a lot of time sitting at a desk or that friend who just never knows what day of the week it is. It is also something they will use all year long which is my kind of gift!
All images © 1990-2018 Stampin’ Up!®
I did a similar project last year and once again High Performance Marketing is printing these calendars for me. They are $1 each or $0.80 if you order 25 or more. Postage is not included. If you live in the Raleigh, NC area you can pop by and pick them up.
Check out all the directions for this project below.As always, please let me know if you have questions or need help purchasing any of the supplies to make this or any of your other holiday projects. That’s my job and I love what I do!
Happy Stamping!
![]()
Supplies:
Stamp Sets – Labels to Love (144967 clear; 144970 wood)
Ink – Shaded Spruce (147088)
Card Stock – Pacific Point (111350), Whisper White (100730), Shaded Space (146981), So Saffron (105118)
Misc. – SNAIL adhesive (104332), Share What You Love designer series paper (146926), Big Shot (143263), Magnetic Platform (130658), Merry Christmas thinlits (146912), Detailed Deer thinlits (147915), Big Shot (143263), Magnetic Platform (130658), Simply Scored Scoring Tool (122334), Tear & Tape adhesive (138995), Mini Stampin’ Dimensionals (144108); 2019 tear-off calendar (available through Pinterest, eBay, etc)
Measurements:
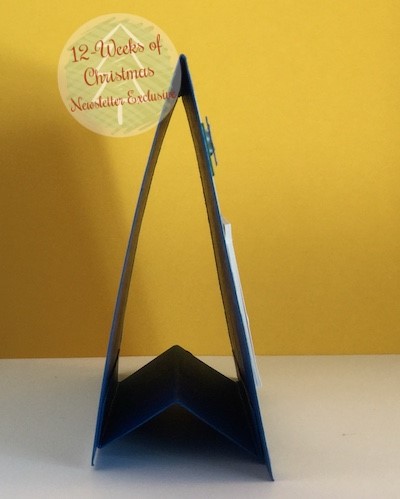
- Pacific Point: 8 1/5″ x 5 1/2″; 4 1/4″ x 3″ (stand)
- Share What You Love: 5 1/4” x 4”; 3 1/4” x 2 1/2”
- Shaded Spruce: 3 1/2” x 2 3/4”; 5 1/4” x 1/2”
- So Saffron: 3 1/4” x 2 1/2”
- Whisper White: 3” x 1 1/4”
Instructions:
- Fold Pacific Point card stock in half and crease to create card base.
- Adhere larger piece of Share What You Love paper to card base.
- Adhere smaller piece of Share What You Love paper to Shaded Spruce layer and then to card front center.
- Attach So Saffron layer to Shaded Spruce layer using Tear & Tape adhesive.
- Using SNAIL, adhere strip of Shaded Spruce card stock across top front of card. Adhere calendar to So Saffron layer using Tear & Tape adhesive.
- Ink phrase using Shaded Spruce ink and stamp onto scrap Whisper White card stock. Die-cut using frame thinlit from Merry Christmas thinlits. Adhere to card front on top of Shaded Spruce strip.
- Die-cut Pacific Point flowers from Detailed Deer thinlits. Attach to phrase layer using Mini Stampin’ Dimensionals.
- Lay Pacific Point card stock layer (vertically) on Simply Scored. Score at 1/2”,1 1/2”, and 2 1/2”. Burnish using Bone Folder: smaller tabs in and center score out.
- Attach stand to inside of card at bottom, using Tear & Tape adhesive as in photo below; the smaller tabs attach to the card front and card back.
POSTED AT NOV 29, 2018 11:00 AM | COMMENTS [0]